 Oops, it’s been over two months since my last post and although there’s been no noticeable activity on here there has been progress in the background with some rationalising of the model rail empire in order to make way for new items that are more in line with the direction of my modelling for the moment. With the weather changing for the better now is the time to get outside and do any dirty work needed. I will be posting about that nearer the time I start out as I have a load of work to do on my room first to covert to a proper bedroom railway room, such as painting and decorating, building a workbench come desk, and some shelving. Like most things house related there are a bunch of other things that also need to happen and that’s before I have to get stuff done out in the garden, but following the mantra of fifteen minutes a night means a little progress is still progress. Little things can be tackled whilst waiting on the big things.
So what’s with the new plan? Well actually it’s not that new and after thinking that I had a lightbulb moment I realised that I had already visualised it for a previous project. However they do say that good ideas float to the surface, or something like that, and it is as good to me the second time around. The idea revolves around the layout having two halves with a rural section and an urban section. I can’t claim to be the originator of this idea and I originally saw it on the Oops, it’s been over two months since my last post and although there’s been no noticeable activity here there has been progress in the background with some rationalising of the model rail empire in order to make way for new items that are more in line with the direction of my modelling for the moment. With the weather changing for the better now is the time to get outside and do any dirty work needed. That will come in time and I will be posting about that nearer the time I start out as I have a load of work to do on the room first, such as painting and building a workbench come desk and like most things house related there are a bunch of other things that also need to happen and that’s even before I have to get stuff done out in the garden, but following the mantra of fifteen minutes a night means little progress is still progress.
So what’s with the new plan? Well actually it’s not that new and after thinking that I had a lightbulb moment I realised that I had already visualised it for a previous project. However they do say that good ideas float to the surface, or something like that, and it is as good to me the second time around. The idea revolves around the layout having two halves with a rural section and an urban section. I can’t claim to be the originator of this idea and I originally saw it on the late Carl Arendt’s site some time ago and although not the exact idea I contemplated it certainly sowed the seed of the current plan. I have scaled back over iterations as I started out with a rather ambitious plan, but I have been trying to encourage focused and achievable modelling and rain in my expansionist tendencies. I did get somewhat zealous in my desire to simplify ending up with the idea of just having a circle of track as I diaorama but realised pretty quickly that it wouldn’t be very fulfilling in operational interest but could allow for testing out some new skills in a small limited space in the future.
Effectively this is just a roundy roundy layout with the yards in the visible sections rather than hidden away from the onlookers gaze. It is a designed to just watch trains and with a bit of automation one can sit back and imagine sitting on the platform watching the world go by with maybe a cool drink on a hot summers afternoon. I tried designing the plan for Kato Unitrack but found that prohibitive cost of just a simple track plan was going to add up to far more than I was prepared to pay. The Unitrack system though is great for starting out and enthusing the young in my view and bit by bit an empire can be built. So that leaves me the option of using Peco code 55 finescale track with handlaid switches. This not only makes for swift progress in the bulk of track laying but also allows me to have custom geometry to squeeze in a little more detail or lines where the Unitrack wouldn’t allow. After quite a absence, I need to brush up my Templot skills and draft out the preliminary idea. I find that it is a great assistance to seeing how the railway fits the room (meaning the actual room and the room on the board) as the 3d world doesn’t always match the reality, my last plan being case in point as it looked great on screen but was never going to fit the space in a month of Sundays.
I am going to attempt shorter posts but more often with a round up probably on a Sunday in order to make it easier to keep up with this blogging malarkey, something along the lines of blog concisely and blog often. It takes me what seems like days to write a post but really what most people myself included want to see it pictures of progress. I hope to have some exciting news for next weeks episode so stay tuned and till next time..


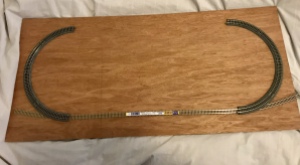 It just so happens that I have some plywood knocking around that was cut for a project long ago that I am going to repurpose. Having a ready made base would speed things up no end, however I’m planning on trying to create a lightweight board with thin strips but braced more frequently for an open board design. As it’s attached to the wall via a cleat most of the weight will be held at that point so every effort to lighten the load is good.
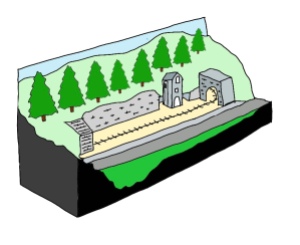
 This may not be new news to some but I thought it was pertinent to bring it up now as I sit down in front of my computer with
  I do love a plan especially when it comes together! For me the planning etc is all part of the fun and I see it as a way to minimise risks of getting things wrong. Maybe it’s a throwback to my professional career but I like to have an order of doing things. I know my friend Andy is the complete opposite and likes to make it up as he goes along. The diagram or mind map as it’s known is not particularly in order but then I will take each section and break down further to give me a more granular approach. I can hear the groans and sighs but it’s what make me happy and it’s my railway as the saying goes. I haven’t quite got to the point of having post-it notes on walls in agile/scrum fashion as even I think that is taking it too far but the digital cork board works for me and as we have access now to all this technology it would be rude not to use it.
Recent Comments