fighting procrastination fifteen minutes at a time

Author: 15minutemodeller (Page 3 of 10)

Otto the big engine.

LGB 0-4-0 Otto

So curiosity got the better of me and I just had to get it out and have a play! That’s what we all do isn’t it? Well I do!

The purpose was to work out if it still worked after years maybe even decades languishing in its box and whether it would either be something to liquidate quickly or to cogitate on not really knowing what the outcome would look like as I have no space to home such large objects. It withstood the test of time and looked, well brand new, untouched in fact. Rather too quickly I was enamoured with its presence and heft. Yes I have seen G scale before but only paid attention because of the Swiss RhB stuff but never really thought much about owning the ‘premier garden rail scale’ far from it as I always thought only lottery winners had the where with all to build in this scale. A quick look at the LGB site advises that the Allegra set I have in N scale is a mere £2500 in G and that’s just one unit. Imagine a modest layout probably costing upwards of 20k But that’s all hypothetical, as purely on its physical size it would need a rather large land grab to have anything half way decent. This was my initial thought unboxing the train-set, but thoughts started to circulate and surmising what a minimum space micro layout might look like, even a very simple inglenook would take up six to eight feet. Then there’s the matter of switches, buy or build?

This is when I started having a reality check and realised that the current line of thought was foolish and decided to relieve myself of the temptation for yet another scale and distraction from the the current project however ever compelling. So time to put it back in its box and get it ready for a new owner, someone who will hopefully get more use out of it than I did.

Now back to normal service and getting on with some modelling. I have a couple of mini projects lined up more of which later.

Until next time..

Lost and found.

Last week I got a call from my best mate and it went something like this. “Hi I’m knocking down my shed next week and there’s a couple of things of yours that you might want to come and collect?”

Apart from it being an end of an era that saw us rescue it from an untimely end and move it bit by bit on a shopping trolley when we were just out of college many moons ago. It was where we plotted and planned our next bit world domination projects from and built our body of skills for the coming years of home ownership.

On arrival it was deemed best to get stuff loaded and the settle down for coffee and bacon sandwiches which seemed the best plan given the early hour of the day. That’s when I was presented with the exhibit below. I had completely forgotten about it, I might be forgiven for this as it was as I say from a dim distant past but it was a surprise never the less and a pleasant one.

So bring it forward to the current day and what do I do with it?! Neither do I have a garden of my own nor the space to run it in doors as G scale takes up a not too insignificant amount of space. But… I do really like the size and presence. But I’m trying to downsize my collection.. but I could have just a little inglenook.. but it could fund my layout project or some more tools, you can never have to many tools. Common sense will probably win out but for a moment I might just set it up on he carpet and watch it trundle around for a bit.. 🙂

LGB G Scale trainset

New local hobby shop

Card kit, glue and paint

A friend alerted me to a new hobby store in a town not too far from me where I volunteer for one day a week so I thought I would take the opportunity to pop in and see what they had and give some support to bricks and mortar businesses. As we know in this day and age of the internet we can get just about anything we want at the click of a button which has not helped the traditional hobby stores.

I knew that they provided for a number of hobbies so wasn’t sure what to expect but was pleasantly surprised at the support for railways. I believe most of there business is done online but it’s location should encourage hobbyists to visit. I had a brief look round as my lunch break was tight but left with the above items at a very reasonable price, the kit brought on a bit of a whim but have a plan what to do with it!

So this weeks public service announcement is support you local shops if you can. Popping in for some glue or paints is not so easy online and you also don’t get tempted by other things.

The model shop visited was

Veteranus Models

Until next time..

Reading Room 04

It’s been a while since my last update nothing worse than a blog that’s not updated so in order to halt the rot here is a post! Life often gets in the way of serious things like modelling which is the case for me over the last month not to mention the unbearably hot weather that seemed to go on forever and didn’t put one in a good frame of mind to sit at the work table and sweat over a hot soldering iron but now we seem to have some more seasonally temperate weather progress can be made. What motivated the mojo return? Well a bunch of envelopes landed on the doormat over the last week also going into my local newsagent and seeing the latest MRJ reminded my that I really need to pull out my finger and get back to building stuff for myself and others. For the moment I have been reading through the latest progress of both model and real railways that I follow and there are some events that sprang to mind that I would like to attend this year. Firstly there’s the 2FS AGM in October which is not that far from me and it would be good to meet up with some friends from 2mil land and then there’s the golden jubilee 2010 layout challenge! Hmmm. I really don’t need to create more distractions for myself and I am assisting a friend by building some track for there challenge, but it is tempting.

Then there’s the steam gala at the Welshpool & Llanfair Light Railway at the beginning of September. This is a bit more of a trip and definitely more logistical challenging. I have long been thinking about trying to do some volunteering for them since my first visit in 2014 but always thought I was too far away to be able to offer much only to then find out from an excellent blog that they have help coming in from Australia! Well that’s some commute and I’m guessing they don’t just pop down to polish the brass of a weekend. So it lead me to think that even though I’m around 170 miles away it’s just a stones throw compared with from the other side of the world. I’m going to look into if I can be of use to them, maybe not for the gala but certainly next year.

Keeping momentum going on a blog is the most important thing in order make the effort of doing it worthwhile and to show to myself that I can make progress if I just stick at it fifteen minutes at a time so expect some more bodging post in the not too distant future.

Until next time..

Switch build 03

First attempt at N scale #6 curved point
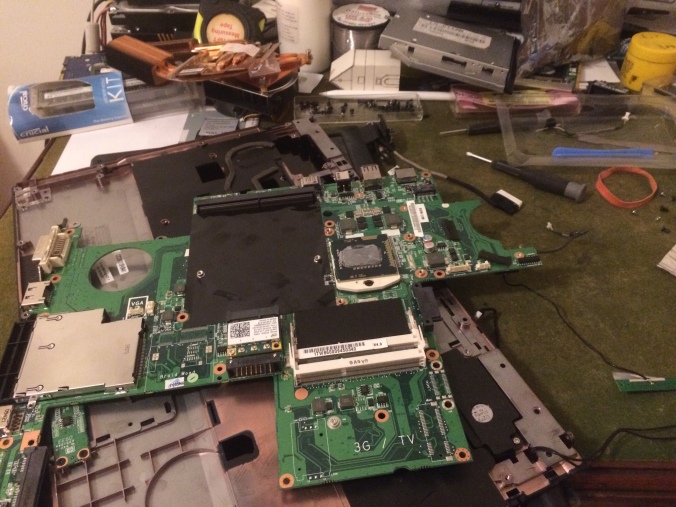
As Kenney Rodgers once said “You gotta know when to hold and when to fold” or words to that effect. But as it’s been some years since I’ve built handlay and that shows with this first attempt. It works in a fashion but it’s no oil painting and I was told some time ago by a friend that it usually takes a couple of goes to get it right and then it’s like falling off a bike. It’s definitely been good to treat this build as a sacrificial and not get too worked up about it being perfect from the start and as would will see I have left flux and a number of joints unsoldered joints knowing that this would not be laid to a baseboard.

So what did I learn from this experience? Firstly get some liquid flux as using the current one is a bit of a pain and liquid flux is much more manageable. I know having the right tools for the job but I also am trying to embrace the just do it mantra and not trying to procrastinate or indulge in analysis paralysis. Second check the rail; not all rail is created equal. Well they are just I didn’t expect there to be different codes mixed up and selecting a slightly smaller rail in crucial places caused major obstructions to the wheel sets. Finally the old adage measure twice cut once.much of the mistakes I made didn’t look right even though they seemed to be gauged right, but the eye is one of the most accurate measuring devices and so with a mixture of eyes and a mirror and trusting to instinct gets results.

But it’s not all bad news as you can see from below excluding the minor mishap. With this info it’s time to move on to the next one.

Until next time..

Switch build 02

Finally found a moment to burn some metal and get started again on first switch. This being N Scale the question was how was I going to gauge this. Well time to break out the trusty callipers, not the digital ones this time as they have plastic prongs and not good at holding a finger singeing rail to gauge but got old fashioned analogue. I tend to use my 2FS gauges to start off soldering first rail to keep it vertical then move to the callipers.

So I started out working on the frog, yes I know that this is not the prescribed method but I am just messing around with ways to build as it’s been some time since I built handlaid switches, but it’s always good to tryout new even if you get it wrong.

Speaking of getting it wrong I forgot to file out the blade pocket on the stock rail again just rustiness but at this size and gauge it shouldn’t be too much of an issue and I can always take a file to it later if needs be.

Until next time..

Room with a railway

I have finally got round to starting to sort out my Railway space and it is a bit strange having an empty room like the day I moved into it. In order to be able to carry out some proper modelling I decided that this needed to take over other modelling progress just for the moment as I really like and need a organised space to work in and around. First up was emptying out the room ready for decoration as the above picture illustrates. Colour decided, check, I have to go to the local paint shop tomorrow and get my preferred colour. The very friendly gent who spent some time with me when I first went in explained colours and approach to painting which was very useful as it must decades since I waved a paint brush around in anger and he advised that one tin should to the job and if not a tester pot should finish it off.

There are a couple of things that I need to complete before I can prep and paint but having an empty room is motivation to get things done quickly. Once painted I can then start on building my workbench and desk. This will then separate modelling from computing and at the moment working off a rickety folding table is not good for ergonomics and also not being able have tools etc around you as they compete with monitors and keyboards.

Although again it may not seem like there is much progress in physical modelling much of the preparation work has been carried out to make sure that the bits of the puzzle all fit together. Certainly rebooting my blog has helped me stay focused and actually making something rather than allowing procrastination to be the thief of time and hopefully very soon I’ll have the modelling space I need and want.

Until next time..

Switch build 01

Work on the first switch for Son of Test Track has started and it’s going to be a 150mm Radius with a 1:7 frog and 9mm track gauge. Why 1:7? It’s mainly because I have the frog nose and crossing jigs in that size. I use to have the whole set but over the years I have lent or misplaced the rest so these are the ones I have to hand at this time.

The process starts with a flat surface, in my case I’m using a lump of 1″ MDF that was a door off the bedroom furniture that came out when I first moved in. The template is spray mounted down to the flat surface and then a quick squirt over the top face to allow the copper clad sleepers from 2FS association to be applied to the template. Using some tweezers to get them to match up as best as possible to match up with the Center line. Now I’m starting to lay the stock rail but before I do I need to file out the pocket for the point blade and here endeth the fifteen minutes.

Until next time..

Digital dismantle

Laptop dismantle Although not strictly a modelling post it is some what linked. Things have been somewhat hectic at 15minute towers this week and also summer has arrived with a bit of a kick with temps in the high twenties and thirties yesterday which as dampened the enthusiasm to sit at my workbench.

From the picture you can see a dismantled laptop I was given in perfectly good working order as the owner had decided to upgrade to a newer much lighter one. One of their criticisms was also that it is very noisy due to the fans always being on. Looking around YouTube I came across a number of videos of people who had converted laptops into silent desktop machines and thought I’d like to have a go at that.

Why you might ask would I want to go to all that trouble to convert a perfectly good working pc into a pile of bits? Well neither do I want a loud machine and also I prefer the desktop format over the now more common place laptop form factor, in order to be able to manipulate it into a comfortable mode of operation.

So the trick will be to be able to find out how I can run it at a suitable temperature that won’t burn out the processor the minute I turn it on. It’s not at all scientific but slapping a huge lump of extruded aluminium on to the hot bits will hopefully dissipate enough heat to let me get a bit of use out of it. I just need to find a stockist locally of such an item that’s not going to cost more than buying a new one.

And now the tenuous link to modelling. I have a couple of uses for it the main one being to use it for Blender rendering as an additional processor to my rather ageing every day laptop. Although I don’t model huge scenes or models it will be good to cut the time spent waiting for the render to finish. And finally I could run a train sim on it although you may say any spare time should be real world modelling but there will be some times it is a relaxing pass time away from all other worldly distractions.

This is likely going to take me some time to complete so don’t hold your breath for too long as I have way more important projects to be working on!

Until next time..

Rail height comparisons

fullsizeoutput_73f
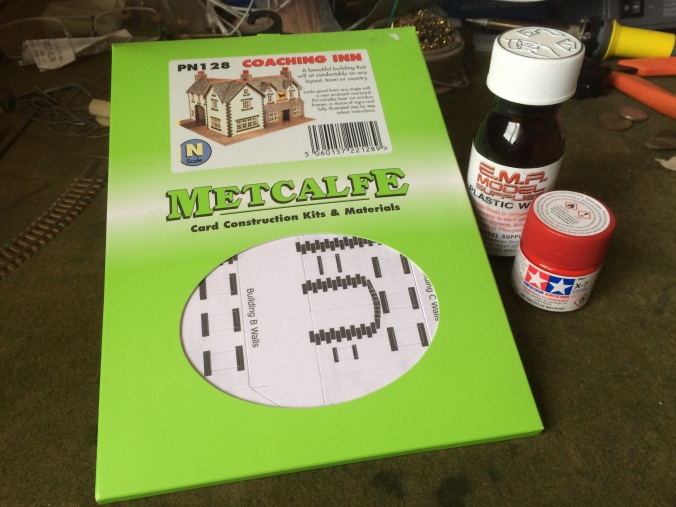
In planning the track for the diorama I needed to find out what the height differentials were between the types  I am looking at using. In order for the scenic section to look somewhat realistic I decided on using some Peco Code 55 FS Concrete Sleepered track and then was contemplating a mixture of 2mm Association track in two formats, the Easitrac moulded plastic sleepering for the straight sections of the yard and then just plain old PCB and coiled code 40 rail soldered construction as used in the test track. I was asked by a friend why didn’t I just use the Peco? My reply was that I had all of the stuff there to build after years of stock piling and it’s so much cheaper. Have you seen the price of curved Streamline switches? But the payoff to using one type is you don’t hat to do any elevation on the road bed.

Now how did I go about measuring the gap? With no depth gauge or other suitable instrument I opted for a rather rough and ready feeler gauge alternative using some styrene sheet with combinations of .10/.20/.30 thousand mm to increment the height until I got a match but rubbing finger over the joint. Yes I know its not scientific or an accurate measurement but for my purposes it is good enough. So with this method in place I ascertained that the PCB to Peco needs a .40thou lift and the PCB to Easitrack is just .10thou of a millimetre. This then raises the question of whether the Easitrack is worth it and I am going to ditch it in favour of just straight interval soldered track like the test track though I may actually measure out the gaps and not freestyle it like I did previously.

Lastly the question is what to do with underlay on the scenic section. I have two types of it one with a rubber backing and a standard old fashioned cork I need to get measurements for these to see how much adjustment the different tracks will need to accommodate in order to provide quiet running and a smooth transition between the two track types.

fullsizeoutput_73d

Until next time

« Older posts Newer posts »